Содержание
- 9.1. Проверка и настройка установки
- 9.2. Создание и использование ситуаций
- 9.3. Создание views для Tivoli Enterprise Portal
- 9.4. Создание правила
- 9.5. Запуск приложения
- 9.6. Использование исторических данных
- 9.7. Создание графических view и использование бизнес-навигатора
- 9.8. Использование CLI
- 9.9. Создание встроенных ситуаций
- 9.10. Creating a custom monitor from a script
- 9.11. Мониторинг URL
В главе использованы материалы [ITM6].
Use the following steps to verify that your installation is complete:
Viewing default situations
Generating a situation event
A situation describes a condition you want to test. When you start a situation, Tivoli Enterprise Portal compares the situation with the values that the monitoring agent collected and registers an event if the condition is met. You are alerted to events by indicator icons that are displayed in the Navigator and, optionally, sounds that play. The graphic view also shows event indicators.
Every Tivoli Enterprise(TM) Monitoring Agent (also called monitoring agents or agents) provides a default set of situations that you can use to begin monitoring your environment immediately.
Use the following steps to view a default situation:
1.Start the Tivoli Enterprise Portal browser client:
a.Start the Microsoft(R) Internet Explorer browser.
b.Type the URL for the Tivoli Enterprise Portal into the Address field of the browser. The URL is http://systemname:1920///cnp/client, where the systemname is the host name of the machine where the Tivoli Enterprise Portal Server and browser component are installed.
c.Click Yes on the Warning - Security window.
A window (Figure 1) is displayed.
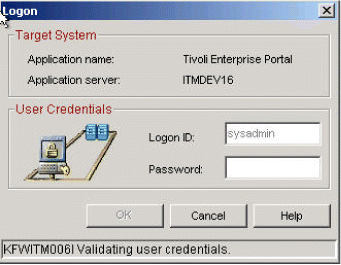
d.Type the user name in the login field. The default user name is sysadmin.
e.Click OK.
2.In the Navigation tree (on the left side of the portal), expand the tree until you see the operating system such as Windows Systems that you installed.
3.To view the default situations, right-click the agent and click Manage Situations.
A list of all available situations is displayed (Figure 2). You can view the status of each situation, as well as other information.

One way to verify that your installation is working correctly is to create a basic situation that monitors a process on your computer. You can use the situation to stop the process manually, which triggers a situation event. For information about creating a basic situation, see Creating a situation.
Complete the following procedures to configure your environment for history collection:
Configuring and registering the Warehouse Proxy
Configuring historical data collection
Use the following steps to configure the Warehouse Proxy:
1.In Manage Tivoli Enterprise Monitoring Services, right-click Warehouse Proxy.
2.Click Reconfigure.
3.Click OK on the message regarding connection to a hub monitoring server.
4.If you have not configured the ODBC data source connection, click Yes and complete the following steps:
Note:
These steps are based on a DB2(R) database. The steps might be different if you are using another type of database.
a.Select the database that you are using for the Warehouse Proxy and click OK. You have the following choices:
DB2
SQL Server
Oracle
Other database type
b.Complete the following fields as appropriate:
Data Source Name
The name of the data source. The default is ITM Warehouse. If you want to define a new data source, type a new name here. Otherwise, leave the default value.
Database Name
The name of the database. If you are defining a new data source and want to specify a different database, type the name here. Otherwise, leave the default value.
Admin User ID
The user ID for the database administrator. The default for DB2 is db2admin.
Admin Password
The password for the database administrator.
Database User ID
The name of the user that accesses the IBM Tivoli Monitoring data warehouse. The default name is ITMUser.
Database Password
Type a password for the database user. If your environment requires complex passwords, include a numeric character in the password.
Reenter Password
Confirm the password by typing it again.
c.If this information is different from what you used when you configured the Tivoli Enterprise Portal server, select Synchronize TEPS Warehouse Information to update the portal server configuration with the same values.
d.Click OK.
Restart the Warehouse Proxy by right-clicking it and clicking Start.
To configure historical data collection, specify the attribute groups from which to save data samplings, the collection interval, the rollup interval, if any, and where to store the collected data. Use the following procedure to configure your historical data collection:
Note:
Your user ID must have Configure History permission to see and use this feature. The default user, sysadmin, has this permission by default. If you create additional users, you must grant them this permission.
1.Start the Tivoli Enterprise Portal client. You can start either the browser client or the desktop client.
To start the browser client, do the following:
a.Start the Microsoft(R) Internet Explorer browser.
b.Type the URL for the Tivoli Enterprise(TM) Portal into the Address field of the browser. The URL is http://systemname:1920///cnp/client, where the systemname is the host name of the machine where the Tivoli Enterprise Portal Server and browser component are installed.
c.Type the user name in the login field. The default user name is sysadmin.
d.Click OK.
To start the desktop client, do the following steps:
e.Double-click the Tivoli Enterprise Portal Desktop Client icon on your desktop:
f.Type the user name in the login field. The default user name is "sysadmin".
g.Click OK.
2.Click Edit -> History Configuration to open the History Collection Configuration window.
3.Do the following steps:
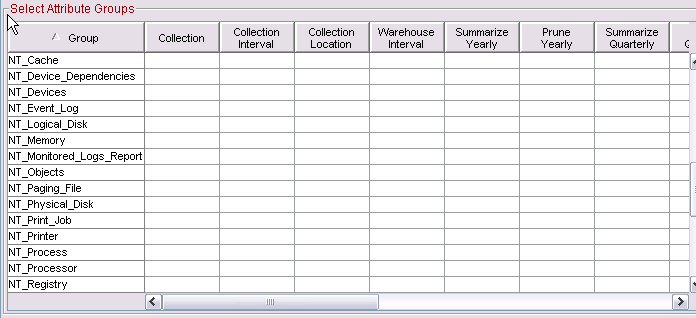
a.Select Windows(R) OS in the Select a product list.
b.Select all attribute groups that start with NT_ from the Select Attribute Groups table.
Note:
Click the Group column heading in the Select Attribute Groups table to sort the attribute groups by name.
4.In the Collection Interval section, select 15 minutes as your interval.
5.In the Collection Location, select TEMA, Tivoli Enterprise Monitoring Agent.
Note:
Collecting data at the agent minimizes performance impact on the monitoring server from historical data management tasks.
6.In the Warehouse Interval section, select 1 day as the interval for the data you want to collect.
7.Click Configure Groups to save your settings.
8.Select all of the groups and click Start collection.
Use the following procedure to configure historical data collection for the Tivoli(R) Monitoring Services Logs:
Note:
The Tivoli Monitoring Services Logs apply to all applications. If you want to save the information in these logs, configure them for warehousing.
1.Select CCC Logs in the Select a product list.
2.Select all groups from the Select Attribute Groups table except for Universal Message and TWORKLST.
Note:
Query support is not provided for Universal Message Log or TWORKLST (Worklist Log).
3.In the Collection Interval section, select 15 minutes as your interval.
4.In the Collection Location, select TEMA.
Note:
Collecting data at the Tivoli Enterprise Monitoring Agent minimizes performance impact on the monitoring server from historical data management tasks.
5.In the Warehouse Interval section, select 1 day as the interval for the data you wish to collect.
6.Click Configure Groups to save your settings.
7.Select all of the groups (hold the Shift key while you click in the list of groups) and click Start collection.
8.Select the monitoring server on which you want to collect the log file information.
9.Click Close to exit the History Collection Configuration window.
Note:
Some of the logs have historical configuration values that cannot be changed. After you click Configure, values that are different from those that you specified might be displayed. The collection occurs at the values that the product determines.